Monday, August 31, 2009

Another raw oatmeal cookie

Made like my previous oatmeal cookie.. this one is just as easy and just as tasty!

Ingredients:
1.75 c oats
1.5 c dates
3-4 t cinnamon
2 T water
4 T agave nectar
dash of salt

First, you'll want to put into the food processor:
.75 c oats
3-4 t cinnamon
dash of salt

Blend these ingredients almost into a powder... but not quite. Leave it slightly chunky.

Next, you'll want to add your dates and agave nectar to this mixture. Blend until chunky - these chunks make for great raw cookies! Don't worry, you'll be smooshing them together so they'll be smooth in the end.

Finally, pour this mixture into a bowl and hand-mix in the other 1 c oats. (This is when you can also add chocolate chips or cocoa nibs if you want.)

Squish into cookies!

Yield: 15 approx 3T-sized cookies

No pictures yet.. I just made them so they're setting in the fridge. I have to completely restrain myself from digging in right now! But guess who also loves raw cookies!.. yes, they make a healthy food for birds, too!

Photobucket

Saturday, August 29, 2009

Raw oatmeal cookies (with or w/o choco chips)

I adapted this from Ani Phyo's Oat Chocolate Chip Cookie.. they aren't the same at all but I did get the idea from her, so I thought I'd mention that! My husband is anti-raisin and pro-chocolate chip, so we changed the recipe just a bit.. and added flax to it as well. I also only made half of her recipe, just to try them. WOW.. these are fantastic. I may have to eat the whole batch!

Ingredients:
1 c medjool dates
1 c oats
2 T agave
2 t freshly ground cinnamon
2 T flax seeds
pinch of salt
Optional: chocolate chips or cocoa nibs (I made half the cookies without choco chips but I let my husband throw in his desired amount of chocolate chips to half of the batter.)

Yield: 10 2T-sized cookies

Blend the dates in the food processor into tiny chunks. Then add remaining ingredients (except chocolate chips.) Blend until the oats begin to break in half.. the cookies will better stick together this way.

Photobucket

Add chocolate chips by hand, if desired. Form into 2T-sized balls. You can enjoy immediately or put in the fridge for the cookies to become more solid.

Photobucket

I did take a bite out of one before putting them into the fridge.. oh my wow. These are my new favorite cookie! We'll have more after dinner. By then the cookies will have a few hours to set in the fridge, so they should be even better. Note: strong, fresh cinnamon is KEY!

...and I already know what I'll be changing the next time I make this recipe:

1. I'll be adding 1/2-1 cup oats to the recipe... by placing the 1/2-1 c oats into the food processor first, before the dates, and blending into oat flour. Then add the dates and follow recipe. When I do this I'll also up the agave nectar quantity to 4 T.

Thursday, August 27, 2009

Yes, you can dehydrate

I'm prone to impulse buying, so I don't shop very often. However, if you're going to buy something to spoil yourself on your raw food journey.. I'd suggest an Excalibur dehydrator! I'll admit that I don't use it as often as I thought I would but I really think that's because we don't live in a very veggie- and fruit-friendly city. The only farmers market we were impressed with this summer is quite a drive from us, sadly. So, I know we'll keep the dehydrator and use it MUCH more when we move to a healthier part of the country.

If you like dehydrating herbs that you buy at the grocery store so they'll last longer, or buying fruits when they go on sale because they're almost too ripe, or just to make your own healthy dried fruit mix.. an Excalibur is the way to go. The drawers are huge, they slide in/out easily, and you can buy up to a 9-tray dehydrator.. that's what I did.. and let me tell you, it's amazing!

I wanted this post to be about dehydrating and how to make it easier, so I should probably get back on topic!..

The key, I think, is to just dig in and accept that you'll be spending the next few hours washing, slicing and dehydrating. I know I like to buy lots of one or two types of fruit to dehydrate. Then, I spend a few hours washing, slicing and arranging them on the trays. Voila! If you dehydrate a lot of your favorite foods at a time, then dehydrating will be worth it.

My hands have only just quit burning.. I've spent the last few hours in the kitchen slicing more garlic cloves than I can count (four trays worth!), as well as jalapenos and even kiwi and strawberries. I had no idea fresh garlic burns your skin if you touch it long enough!

We may decide to grind the dehydrated garlic into powder. I don't know yet. But I do know that once the jalapeno is dried I'll be grinding it in the coffee grinder. I just love jalapeno spice!

Photobucket

Photobucket

Photobucket

This last tray may not be beautiful.. but I bet it's going to be tasty! If you have kids or if you're like me and you love fruit roll ups, dehydrating is a great way to use fruit that you just won't have time to eat before it's bad. It's so easy, too! Just process (in a blender or food processor) and pour. I have two trays, that will yield two large fruit roll ups, made from pears and cherries that were getting too ripe. I can't wait to try them!

While all of these are dehydrating.. I actually have about 10 cups of freshly sliced pineapple marinating in the fridge. I filled the dehydrator faster than I expected today!

Photobucket

You know the beauty of un-cooking is that you can sample your foods as often as you like, without feeling guilty. So, of course that's what I did while chopping the pineapple and I was expecting a tart, strong, juicy bit of pineapple.. and was seriously let down. Win some, lose some I guess. But I had 3 pineapples sliced and ready to dehydrate.. what was I supposed to do? Well, I'll tell you!...

I drizzled probably 1/3 - 1/2 cup raw blue agave nectar on the pineapple and swirled it around. Agave goes so well with pineapple! So, I'll swirl around the pineapple in the agave and juice until the dehydrator is empty tomorrow.

Photobucket

Dried pineapple is definitely one of the best foods on earth!

Ever notice how packaged dried pineapple tastes like sugar and not pineapple? That's because it's mostly sugar! Dry your own and you'll actually taste the fruit. It's soooooooooooo good.. and worth the effort.

Setting up your raw food kitchen

Most of us transitioning to raw have thought about the costs of doing so. Will it be too expensive? Exactly how much will it cost? If you're like us, when you look in your cabinets you still have flour, rice and all of the other foods you used to rely on, right?

Well, if you're going to transition to having more than just the random raw dessert here and there, you'll need to start making a real commitment. You don't have to do it all at once.. but a little at a time. However, you know that if you don't make raw food ingredients easily available, you won't use them. Right?

I used to keep these containers filled with rice, cereals and other goods.. but now they're my raw seed and nut containers. Period.

Photobucket

Whenever we want raw tacos.. I know where the ingredients are. And for those amazing raw desserts, you'll always need nuts, right? Well, organize your kitchen this way and you'll be able to make anything your heart desires!

Okay.. you're probably asking how much this cost. Well, I'll tell you.. these packages were about $38. That's not much, right? Especially when you consider that these are the main ingredients in SO many dishes.. and we only have to refill our containers about once a month or every 3 weeks. Just think of how much your regular cooked food actually costs now...

Photobucket

You can see I get between 1-2 lbs at a time of our favorite nuts and seeds. We actually haven't had to refill our supplies in quite a while! And we use these all the time. I'm always adding raw nuts to salads, making desserts, raw snack bars for Tyler to take to work and we make a few nut meats, too. And yet these nuts seem to last forever!

We keep several cups of flaxseed on hand all the time, too. We keep about 1-2 cups of ground flaxseed in the fridge, so it's there when we need it. And we do use it all the time! You can buy it already ground or go the cheap way (like us) and purchase whole seeds that you grind in your coffee grinder as needed.

... needless to say, I'd suggest that you start designating a part of your counter and containers specifically for your raw foods.

The more you see them, the more you'll want to use them!

Sunday, August 23, 2009

Update on raw cheesecake

Well, the presentation is beautiful! Yes, the pie is absolutely raw - but the topping is not. Those are lingonberries. I just love lingonberries!

Photobucket

The texture is absolutely perfect. And it's perfect straight out of the freezer. Just be sure to cover the pie, rather than leaving it in the springform pan. Usually I slice my pies and place them in an airtight container.. then they're ready all the time!

Photobucket

As with regular ol' cheesecake, the raw version gets better with age. So, I definitely suggest making it at least one day in advance. However, here are a few things I'll change for my next batch:

1. I bought acidophilus yesterday. I'll add it to the cheesecake mixture and let it sit for a few hours before freezing. Honestly, this cheesecake wasn't sour enough for me. But the acidophilus will ferment the mixture.. giving it that wonderful, strong cheesecake flavor. I'll post the result for sure.

2. Use a blender for the cheesecake (not the crust,) instead of the food processor.

This cheesecake was almost perfect!.. but with these minor changes, I'm certain it will be even better.

If you are planning to make a raw dessert, this one is easier than you might think. Give it a try! You won't regret it.

Saturday, August 22, 2009

Crispy fruit rolls

For the healthy vegan, these pastry wrappers are a must! I've only been able to find them at Asian markets, so don't even bother looking for them at a general grocer. Besides, you can find so many cheap, yummy veggies at Asian markets.. you're missing out if you don't go!

Photobucket

These pastry wrappers make super low-calorie, crunchy desserts and snacks - and fast! You can use any of your favorite fruits, or whatever you've got on hand. I'm sure they'll turn out lovely!

For these I used a ripe peach and a large handful of fresh cherries. Wash and slice the peach and slice and de-pit the cherries. Now all you'll need is to open up the pastry package and separate out about a dozen of the pastry sheets. Immediately put the remaining sheets into a sealed container and back into the fridge or freezer.

Photobucket

Now just put a few pieces of each peach and at least 1/2 of a cherry onto each sheet and roll like an egg roll! I didn't even spray these with oil before putting them into the oven but you're welcome to. It'll give them a crispier, more fried-like texture on the outside. But for a light 20 calorie (plus fruit) snack, these plain rolls can't be beat! Seriously.. only 20 calories a sheet!

Put the completed rolls into your oven at 350 for up to 25 minutes. Check them every 10 or so, just to make sure they're not burning accidentally. Keep an eye out for the edges to start browning. That means they're almost done. Remove from the oven before they become too dark.

Photobucket

Voila! Serve with raw agave nectar, maple syrup or your favorite dip. But honestly, these are great on their own.. so no extra dip is necessary. Trust me, you will devour every single one!

First raw cheesecake!

My recipe is easy enough. I read several recipes online, just to see what they all have in common.. here's what I found out: nuts/seeds, limes/lemons plus a sweetener. So, I took my favorite ingredients and put them all together in this recipe! It's actually in the freezer right now, so I don't know exactly how it turned out yet.. (we'll have to wait and see!)

Prepare in advance:
2 c cashews, 1/2 c pine nuts soaked overnight (or for at least a few hours.) This will become the meat of the pie.

Crust ingredients:
Blend 1 c almonds, 1/2 c macadamia nuts in food processor until very fine. Then, add 3/4 c dates and blend. Spread around your lightly-oiled springform pan. You can spread the crust around the bottom only or come up the sides of the pan for an inch or more. It's your choice.

Pie ingredients:
The 2.5 cups of soaked cashews and pine nuts
Up to 1 inch vanilla bean (use only the scraped out seeds)
Dash of sea salt
Medium lemon and lime, juice and pulp (amount approx 1/2 c)
1/2 c raw agave
1/2 c oil
1 T + 1 t ground flax seed
Plus, 1 T water (if pie mixture is too thick while blending)

While transitioning into raw foods, you'll probably want to use the rest of your regular ingredients around the house - like olive oil, vanilla or other alcohol-based flavors and processed sugars, if you have any. So, when you're starting out feel free to substitute any of those ingredients for the raw ingredients above. In fact, I used cold-pressed olive oil for the oil in my raw pie because we still have a ton of it in the kitchen.. and honestly, I that's one area of raw foods that I'm still figuring out. As someone who has never liked coconut oil - I'm finding out that tons of raw food recipes use raw coconut oil in them. I suppose I'll have to learn to like it or find another raw oil to use in its place! We'll see...

Anyway, back to the cheesecake!

Start by blending the almonds and macadamia nuts for your crust in the food processor. Blend until they are very fine. Only then will you add the dates to the mixture. Blend until this becomes sticky and smooth. Then, just spread it around your springform pan.

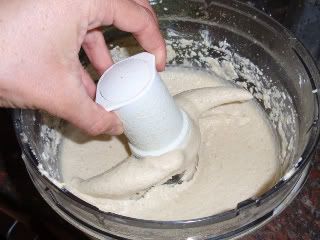
Now, you'll want to blend all of your cheesecake ingredients in the processor until VERY smooth. This may take several minutes and you will probably have to use a spatula to push all of the pie mixture to the bottom of the processor a few times. Just keep checking on it every few minutes, pushing the mixture down as necessary and blending again. Do this until the cheesecake mixture is smooth, smooth, smooth. You could use a blender, if it's strong enough. (I recommend using a blender, actually.. I thought my foot processor would make it smoother than my blender.. but I don't think it worked. I'll try the blender next time.)

Photobucket

The last step is to pour this mixture onto the crust. That's it! **You may notice that I've also pushed the edges of the crust down to the height of the pie. When I put the crust into the springform pan I wasn't sure how much pie mixture I would have, and I accidentally made the crust go too far up the side of the pan. So, after pouring the cheesecake into the crust I just used my finger to press down the excess crust all the way around the cheesecake.

Photobucket

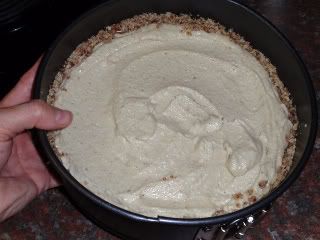
Now place in the freezer to set. It will be ready as soon as it's cold.. which should just be a few hours. I noticed while I was pouring the cheesecake into the springform pan that my mixture is really very thick. I think this will make a great, filling (but heavy) cheesecake.

I can't wait to try it! When it's ready, I'll remove from the freezer, let it thaw a few minutes before removing the edge of the springform. Then, just slice and serve with lots of fresh fruit on top! I may even spread a little agave nectar or maple syrup on top of the fruit.

YUM!

Raw desserts are especially easy to make.. once you have your kitchen set up for raw foods, that is. (But I'll post more on that in a bit. Sorry, I probably should've started with that!)

Easy fruit and grape-nuts breakfast, dessert or snack!

Not totally raw but completely satisfying.. This snack is one of the reasons a food processor is so so so so handy!

Throw in equal amounts of frozen strawberries and frozen bananas, about 1 cup each. Blend until smooth and fluffy~ That's all there is to it. Serves 2.

Pour into a pretty glass and serve with some grape nuts on top. Makes a wonderful dessert, snack or salad. It really hits the spot!

Photobucket

Monday, August 10, 2009

Another easy, raw chocolate pudding

Have you tried my previous pudding recipe? I hope so!.. it's quite rich and satisfying.

http://bicyclingvegan.blogspot.com/2009/02/easy-fast-and-healthy-chocolate-pudding.html

Here's another chocolate pudding recipe, just as filling but much lighter and fruitier.

Ingredients:
Frozen bananas (serving: 1.5 bananas per person)
Cocoa powder (1-2 T per serving)
Optional raw agave nectar

In a food processor mix bananas, cocoa and sweetener until very, very smooth.

raw pudding

If you prefer something in between these light and rich recipes.. just mix 1 banana with 1 avocado and add your desired amount of cocoa. Voila!

Enjoy!

Everyday raw pie

Do you have a serious sweet tooth? Do you want dessert everyday? Well, with raw foods.. you CAN! I actually put the ingredients in the food processor while I was making dinner. Then, all I had to do was pour it into the crust, pop it into the freezer and it was ready!

Pie ingredients:
Mini graham cracker crusts
2 frozen bananas
3/4-1 c frozen strawberries
Up to a few T soymilk

Optional toppings:
Maple syrup or agave nectar
Fresh fruit of choice

If you keep these mini pie crusts on hand, you can throw together a dessert in just a few minutes!

crust

Directions:

If you've read my earlier posts you'll know that I recommend peeling, breaking apart and freezing organic bananas .. so you can make a dessert anytime! So, just pull out two frozen bananas and a cup of frozen strawberries. Place these fruit into the food processor and turn it on. Now add a few T of soymilk to allow the fruit to mix together. You may have to let the fruit thaw for a few minutes before it will mix completely. Just remember, you don't want to add too much soymilk because you don't want the fruit mixture to become too thin. Just add a few spoonfuls of soymilk, allow it to thaw and mix. Then, allow it to thaw and mix. Repeat until the fruit is completely smooth. (Plus, if you let it blend for a few extra minutes your pie filling will become soft and fluffy, too!)

Now, pour the filling into the six pre-packaged pie crusts. That's it! Keep these pies in the freezer. If you're making this pie to be eaten almost immediately, just leave the pie in the freezer for about a half hour to chill. Then it's ready! When you decide to eat the remaining pies, just let them thaw for a half hour before serving.

The final step is to cover with your favorite fresh fruit and pour a tablespoon or two of maple syrup directly onto the pie and fruit.

Enjoy!

Tyler prefers his with strawberries:

raw pie

I prefer raspberries:

raw pie

Saturday, August 1, 2009

Healthy, sweet drinks.. say goodbye to soda!

So this isn't raw.. but I don't have a juicer yet. In the meantime we buy fruit concentrate to add to carbonated water.

All you have to do is buy inexpensive, generic soda water.. it comes in 2-liter bottles. Now, to get sugar-free true juice concentrates you'll probably have to shop at a health food store. Just because something says "juice" doesn't mean it is!

The serving size says 8 teaspoons.. but honestly that isn't necessary. I like to just add a small squeeze of the juice concentrate along with a small squeeze of raw agave. Mix! The carbonated water makes this quite a yummy treat that you can enjoy all the time!

Photobucket

Raw agave nectar is 70% fruit sugar, so has a low glycemic index. That's means it's the perfect sweetener for diabetics or anyone who cares about their blood sugar levels.. plus, it's tasty! Fruit sugars are also 25% sweeter than typical refined white sugar so you'll use less of it, too. Counting calories? Switch to agave nectar!

Add fresh fruit to your drinks for a fancy presentation. Try any fruit juice concentrate you can find. Personally, I like to add lemon juice to carbonated water.. no sugar required. Yum!