Wednesday, November 30, 2011

Spaghetti squash is surprisingly yummy

IMGP2115

I can't believe that I don't eat spaghetti squash more often.

Did you know the paler spaghetti squash has something along the lines of 40 calories per half cup?! Amazing!

Preheat your oven to 350.

Slice spaghetti squash length-wise. Place face down in cast iron skillet or pan. I also put 1/2 inches of water in the pan with the squash, to keep it very moist.

Cook 30 minutes. This may or may not be enough (depending on how efficient your oven is.) So flip the squash and see if the meat is soft. If it is -- this is the fun part!

Using a fork, slide it inside the squash to remove the meat. It'll come out in strands.. just like spaghetti!

VARIATIONS

Top with Alfredo sauce (made from Chreese + mylk).
Top with salt and pepper.
I bet this would even be good with sugar on top as dessert!

You can't go wrong. Eat it. Enjoy!

Easy roasted veggies

IMGP2113

This is healthy, yummy, exquisite and beautiful when served!

Serves 2
INGREDIENTS
1 large potato
3 med/lg carrots
3 stalks lg celery
1-2 T olive oil
2 T soy sauce
2 T frozen oj concentrate (or use orange juice but you'll have to cook off the water)
Spices: garlic, paprika, thyme, parsley, rosemary, salt, pepper

Dice all veggies. Place in bowl with oil. Shake. Add soy sauce and oj. Mix. Shake. Mix.

Add spices. Use about 2 T of your favorites. Add 1 T of others. Don't be afraid to use extra spices.

NOTE: to speed cooking time, cut your carrots and potatoes smaller. Celery can be left larger. It's the potatoes and carrots that take the most time. So be prepared to cook them an hour if you leave your veggies large like I do.

Cook 350 degrees for 15 minutes. Stir. Cook another 15 minutes. Stir.

Turn up to 425 degrees for 15 minutes. Pierce veggies with fork. If they're not done to your liking, just stir and put back into oven.

This takes about an hour, so start the veggies first. Play some jazz and have some wine while you make the rest of dinner. Voila! The veggies will be ready just in time.

Friday, November 25, 2011

Thanksgiving feast

* * * No animals were harmed in making of this fantastic holiday feast * * *

IMGP1892

Recipes to follow...

IMGP1894

Enjoy savory Thanksgiving-y foods year-round! Why wait until a holiday?

Monday, November 21, 2011

Very vanilla dessert / breakfast / anytime cake

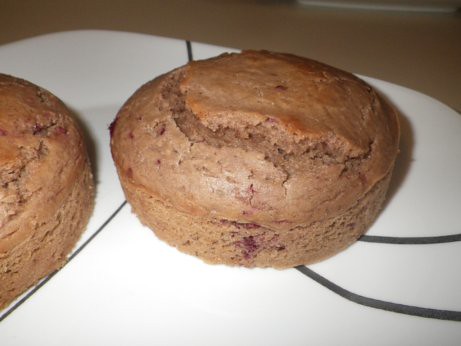
The best cake you will ever have. Srsly.

IMGP1839


INGREDIENTS

1 1/2 c flour (I use whole wheat)
1/2 c raw sugar
1 t baking soda
1/2 t sea salt
1 container vanilla yogurt
1 T oil (I use almond oil)
1 c mylk (I use almond)
2 T vanilla


DIRECTIONS

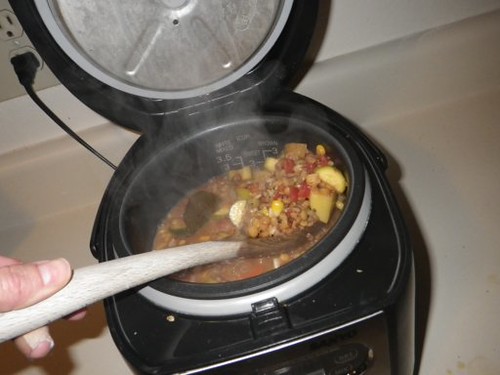
Mix your dry ingredients. Now add wet ingredients. You want a very wet batter. Ta-da!
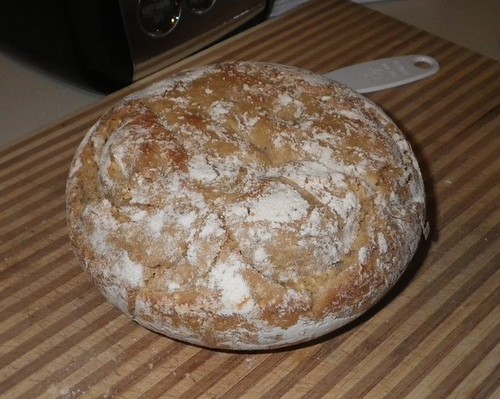
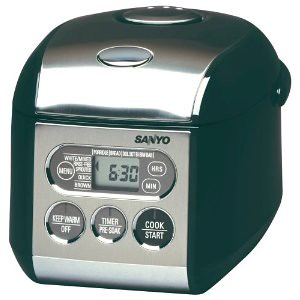
Pour into your new automatic, fun gadget. Press "bread" function.

Or, if you haven't purchased this awesome machine.. Bake at 350 degrees for about 30 minutes. The cake should remain moist.

Trust me.. even three days later, these leftovers are exquisite.
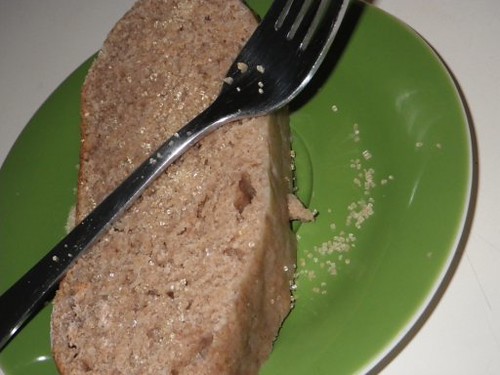

TOPPINGS

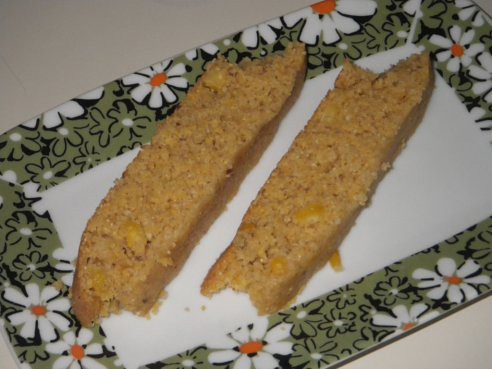
Thaw frozen strawberries. Add some corn start to the juice to thicken a little. Smother your cake.

Add a healthy chocolate syrup: Mix 3 T agave + 1-2 t almond oil + enough cocoa powder to make a syrup. Yes, it really is that easy!

You'll see in the photo, this time I just sprinkled with a little raw sugar for a crunch. WOW. Simple and wonderful.


QUESTIONS

WHY do I use the ingredients that I use?

*I like vanilla! Use more, not less.

*I only use whole wheat flour when I cook... but you could use whatever you have. Just remember, if your flours, sugars or any foods are unnaturally uniform -- you probably shouldn't be eating them. (That includes iodized salt, white sugar, white flour, etc..) There is no nutritional value in these "foods". They are remnants of an age in our history when these uniform foods were a status symbol. And we all know what diseases plagued the rich!.. obesity, diabetes, early death.. oh wait, is this ringing a bell?

*Almond oil is sweet (and I use it in my raw chocolate treats) but you can use whatever oil you want. Add more if you want, too. Remember, the yogurt has fat in it, that's why I lowered the amt of fat I added.

*Don't be afraid of whole sugars! I lowered the amt sugar because the yogurt is sweetened. But if you're making this for someone who likes traditional/processed/overly sweet sweets, then add more sugar like the original recipe calls for. Then, gradually reduce the amount.

Monday, November 14, 2011

Sweet cornbread (made in my rice cooker)

If you love sweet cornbread (like my husband).. dig in! It's rich, corny and amazing.

Feel free to double, triple or quadruple this recipe. Make it into muffins, cakes or whatever shape you prefer.

IMGP1791

INGREDIENTS

1/2 c corn meal
1/2 c whole wheat flour
1.5 t baking powder
1/2 t salt
Up to 1/3 c raw sugar
1/3 c corn (fresh or frozen)
1 t flax meal
3/4 - 1 1/4 c almond mylk (or your favorite) -- make a wet batter


SO EASY!

Mix the dry ingredients together. Add the wet ingredients. Then add corn. Mix well.

Pour into your new automatic, fun gadget. Press "bread" function.

Seriously... I don't think this could get any easier!

Saturday, November 12, 2011

Chocolate cake (made in my rice cooker)

> sorry no picture.. we ate it too fast! >

INGREDIENTS

1 c whole wheat flour
1/2 - 2/3 c sugar
3 T cocoa powder
2/3 t baking soda
1/3 t salt
2/3 c strong, strong, strong coffee (or water if you don't use coffee)
1/4 c oil
2/3 t vinegar
2 t vanilla (or more!)

Honestly, I don't think this cake could be easier to make.


DIRECTIONS

Mix dry ingredients in bowl

Then, add wet ingredients.

Stir until well mixed and all dissolved.

Pour into your new automatic, fun gadget. Press "bread" function.

Wait 80 minutes -- it will beep at you. Flip for the last 10 minutes of the cycle.

Tada!

Enjoy with a yummy, healthy peanut butter icing:

INGREDIENTS

1/2 c real peanut butter
1/4 c whole wheat flour
1/4 c maple syrup

Thursday, November 10, 2011

Several stews (in my new rice maker)

Stew. Wow. Yum. The only thing better?.. having it with a a slice of homemade bread!

IMGP1789

Do you know what is so fantastically wonderful about this little gadget?? Coming home to dinner! This is soooo easy. Unbelievably awesome. The apartment smells wonderful. Dinner is ready. Wow. How did I ever get along without this?

The only thing that limits this products usage is your imagination..


VERSION 1

2.5 c water
1/4 c brown rice (dry)
1/4 c lentils (dry)
1/4 - 1/2 c boca crumbles (or sub plain TVP + spices)
2 stalks celery, sliced
1/2 zucchini, sliced
1 carrot, sliced
medium potato, diced medium sized
1 bullion
2 heaping T nutritional yeast
1 t paprika, garlic, onion, chili powder, raw salt

VERSION 2

1/4 c lentils (dry)
1/4 c brown rice (dry)
1/4 c rotel (use as spicy as you want)
2-3 c water
Approximately 1/4 c: frozen corn, diced potato, peas, diced carrot
2 stalks celery, sliced
2 T bullion + garlic, paprika, onion, salt

VERSION 3

Try curry!


How easy is this? Put all of your ingredients in the cooker. Hit start. That's how easy. Or, alternatively you can throw this in before you leave the house and set the timer... then dinner is ready when you come home!

That's it!


OPTIONS

* Don't have a cooker? Just cook this right on your stove. I put the harder veggies in first... cook about 30-60 minutes, then add softer veggies. If adding pasta, add it with just enough time (according to the package) at the end.

* You can play around with the spices. You can open the lid, stir and smell it. That's how I always decide when/if to add more spices and what to add. * Don't be afraid! Trust that nose of yours.

First batch: homemade bread in my rice cooker

Wow. Yummy.

Smells great. Looks great. Tastes great!

IMGP1770

INGREDIENTS

1 3/4 c wheat flour
1 c scalded almond mylk
1 T olive oil
2 T agave nectar
1 1/4 t active dry yeast
1/4 c millet seeds
1-2 T poppy seeds
up to 1 t salt

Instructions are fairly easy. While scalding your mylk. In a bigger bowl, mix the oil, agave and salt. Once mylk is scalded, pour into the bowl. Mix. Let sit until warm, not hot.

Once warm, add yeast. Mix. Let sit until dissolved.

Now, slowly add wheat flour and all seeds. Knead about 10 minutes. Put flour into bowl. Add your dough. Voila.

REMEMBER: this dough is very, very, very sticky. So you'll want to throw whole wheat flour on it and on your hands each time you knead the dough. It also gives it this pretty finished look.

Follow instructions of your new automatic, fun gadget: press "bread" function. Press "start". After 40 minutes you'll hear a beep. Press down dough and turn it over.

After another 40 minutes you'll hear another beep.

Flip dough. It'll have 10 more minutes to cook.

That's it! Now enjoy the smells, tastes and health of your healthy, homemade bread.

OPTIONAL:

Add 2 T - 1/4 c sunflower seeds, pumpkin seeds or even 1/2 c dried fruit!

Everyone needs this automatic toy

What is it?

sanyo

It's brilliant!.. that's what it is.


Product Features

Color: Black
  • Rice cooker/warmer with micro-computerized technology
  • Bread-baking function; multi-menu selections for one-touch cooking
  • Nonstick inner pot; pre-soak option; reheat function; keep warm
  • LCD clock and timer; measuring cup, instructions, and recipes included
  • Measures approximately 11 by 9 by 8 inches


What does all of this mean?


Well, you can make bread in your rice cooker! In fact, you can set it to bake it before you wake up. Genius, right?

Want to lose some weight? You can set this magic machine to have low-fat, healthy, delicious breakfasts (of oatmeal, millet, rice or even a whole grain bread)... you can have it make rice and keep it warm until you're ready to eat.. you can set it to have dinner ready when you are!

Plus - and this can't be stressed enough - it's attractive enough to sit on your counter at all times AND it's tiny, tiny, tiny. Perfect!


I'm searching for recipes today and will, as always, tweak them to be healthy, delicious and creative before posting for you.

Where can you get one of your own? CLICK HERE!

I hope you enjoy!

Wednesday, November 9, 2011

Shortcut pizza

In a hurry? You can still make a healthy pizza!

IMGP1746

INGREDIENTS

Vegan naan
Organic pizza sauce
Artichokes, canned in water (super low-calorie!)
Kalamata olives
Diced tomatoes
Smidge of daiya cheese
Red pepper + Nutritional yeast == hot, cheesy sprinkle topping


Preheat oven to 425.

Using your vegan naan, layer sauce + tons of artichoke hearts + olives (kalamata are the best), tomatoes and anything else you can think of.

Now barely sprinkle your daiya cheese on top. Trust me, it doesn't take much to make this pizza scrumptious!

Cook < 20 minutes. It depends on your oven. But I find 425 makes the naan super crispy and melts the daiya.


Who says vegans can't be lazy? Enjoy!

Inside-out sushi

I can't believe I didn't try this sooner~ Inside-out sushi is soooooooo good (and easy, too.) Who would've thought?

IMGP1766


Serves 2 hungry people.

INGREDIENTS

1 c dry short-grain brown rice (or sub sushi rice -- or even mix it half/half)
1/4 c rice vinegar + 1 1/2 T raw sugar + up to 1 t salt
Veggies of choice, cut into strips / julienned (carrots, bell peppers, celery, avocado, asparagus.. anything!)
Nori (raw or toasted)

You'll also need:
Wax paper
Sushi roller
Sharp knife


Step 1

DO THIS STEP AT LEAST A FEW HOURS EARLIER. You can even do this a day before. Cook 1 cup dry brown rice in 2.25 c water. Boil about 30-40 minutes. You want it to be overcooked a bit. This will make it stickier.

Now, mix your rice vinegar + sugar + salt. When rice is done, add your vinegar mixture. Stir. Squish this into a bowl, cover and put in the fridge for a few hours. Rice must be cold to use.

Step 2

When you're ready to make sushi... Lay out your wax paper. Put your sushi roller on top of the wax paper. Now, take out a piece of nori. Do you see those handy little lines in the paper? Snap that Nori in half using those lines.

Step 3

Lay your nori on the roller. You're going to cover the nori with your now-sticky brown rice mixture. Keep your hands wet (this helps the rice not stick to you.) Use enough rice (about a quarter of what you made) to cover the nori completely from edge to edge.

Step 4

Now you're going to pull your wax paper from underneath the sushi roller. Put it on top of the sushi you're making. Holding the sushi between the roller and wax paper, you're going to flip everything upside down. (So now it's wax paper underneath, sushi in middle and roller on top.

Simply put your roller under the wax paper now. Your sushi should be rice-side down and nori-side up.

Step 5

Fill with julienned veggies!

Step 6

Use your roller to evenly roll your sushi into a roll:

IMGP1758

Squeeze as you roll the sushi. The wax paper will help you press the rice into the nori.

Step 7

Use your very sharp knife (keep it wet to prevent sticking) to slice the sushi.

IMGP1765

This will be the best sushi you've ever made. Promise.

YUM!


Tuesday, November 8, 2011

Delicious, healthy(ish) berry cake

IMGP1752

This recipe filled 2 small springform cake pans. I thought it would serve 4 (two people per springform pan) -- but honestly, after what I originally considered "1 serving" (half of one of the 4" springform pans), I nearly exploded. So, this could actually feed up to 8 people! (Silly me.. I thought I had shrunk the recipe to be a small amt.)

On to the fun stuff...

Preheat your oven to 375. Now get your ingredients ready.

INGREDIENTS

1 c whole wheat flour
1/2 c fresh or frozen berries (raspberry, blackberry or any berry you like!)
1 1/4 t baking powder
1/4 t salt
1 T ground flax
1/4 c oil
1/2 c raw sugar
1 1/2 t vanilla
3/4 c almond mylk (or your mylk of choice)

DIRECTIONS

Mix the flour, baking powder, salt and flax together. In a separate bowl, mix the oil, sugar, vanilla and mylk.

Now, add a little at a time and the liquid to the dry. Mix thoroughly as you go along. Mix, mix, mix.

You'll notice because you're using whole sugars that they are chunky in the batter. Don't worry. You're going to let it sit for 15 minutes before baking.

Now add your berries. Mix and let sit for 15 minutes.

Use a tiny amount of oil in your pans to prevent your cake from sticking.

Pour into the pans.

Cook almost 30 minutes. Watch it!

Voila. You'll have a rich, sweet, fruity, vanilla-y treat.

Need to serve 2-4 people and don't want leftovers? Just half the recipe. 

Wednesday, November 2, 2011

Yummy, hearty, healthy corn pizza crust


INGREDIENTS

3/4 cup whole wheat four
3/4 cup corn meal
1 pkg. yeast
1 tablespoon olive oil
small pinch salt
1 teaspoon sugar
1/2 cup warm water


Start: 

Mix warm water + sugar + yeast. Let sit 5 minutes. 

Mix flour + cornmeal. Add water mixture. Add oil. Mix very well. 

Wait: 

Let sit covered in a warm place for 45 minutes. 

Finish: 

Preheat oven to 450.

Roll your crust out as thin as you can. Bake 15 minutes without toppings. Add toppings and broil about 5-8 minutes. WATCH so it doesn't burn! Yummy. 

Enjoy!